Configuring VRF-Lite on IOS and Junos
This post is going to provide a very basic introduction to configuring VRFs on Cisco IOS and Juniper's Junos. There's so many configuration combinations and options for virtual routing that it would be impossible to go through everything in great detail. At the end of the post I'll provide links to documentation where you can get detail if you want it.
This post is the second in my series on virtual routing. The others are:
IOS⌗
IOS is rather straightforward when it comes to configuring a VRF. Give the VRF a name, bind some interfaces to it, install some routes, and you've got a basic setup ready to go.
switch(config)# ip vrf guest_inet
switch(config-vrf)# description This is the VRF for guest Internet
The ip vrf command creates the VRF. This is the minimum configuration required when using VRF lite.
switch(config-vrf)# interface vlan200
switch(config-if)# ip vrf forwarding guest_inet
switch(config-if)# int tunnel5
switch(config-if)# ip vrf forwarding guest_inet
Interfaces are bound to a VRF using the ip vrf forwarding command. With the command applied, all packets traversing the interface will be forwarded according to the routes present in the named VRF's routing table.
The commands above would be suitable for the middle switch in this little network:
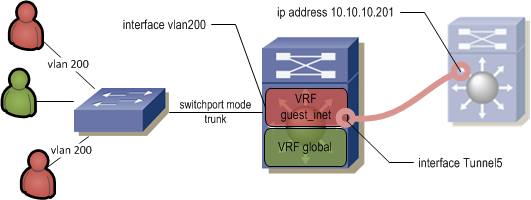
We still don't have two-way traffic flow though. The network where the guest users are sitting will be present in the guest_inet routing table because the connected route for the vlan200 interface was installed as soon as the interface was bound to the VRF. However there is no route present which directs traffic through the tunnel interface towards the Internet. Although it's possible to run dynamic routing protocols in a VRF, that's a little more complicated than I plan to get in this post. Instead, I'll just show how to add a static default route.
switch(config)# ip route 0.0.0.0 0.0.0.0 10.10.10.201 vrf guest_inet
The command is just a default route pointing to the far end of the tunnel with the addition of the "vrf" keyword at the end. This route is now present in the guest_inet routing table.
To do some reachability tests inside the VRF, use the ping and traceroute commands also with the "vrf" keyword.
switch> ping 10.10.10.201 vrf guest_inet
switch> traceroute 10.10.10.201 vrf guest_inet
One of the easiest ways to trip yourself up is to accidentally do pings and traceroutes from the global table. If you're not careful you can end up wasting a lot of time troubleshooting why your ping isn't working. Also remember when looking at the routing table to specify the VRF.
switch> show ip route vrf guest_inet
Lastly, to see a list of configured VRFs along with their interfaces, use the show ip vrf command.
switch> show ip vrf interface
 Interface         IP-Address          VRF           Protocol
 Tu5               10.10.10.200        guest_inet    up
 Vl200             10.200.200.1        guest_inet    up
JunOS⌗
Junos has the concept of routing instances which are used to setup separate instances of OSPF, ISIS, BGP, etc, as well as static routes. Interfaces are bound to routing instances and each instance has at least one routing table and a single forwarding table. The first contrast with IOS is that Junos has different types of routing instances. There are types for Layer 2 VPNs, for Layer 3 VPNs, and for basic virtual routing. The "VRF" instance type is actually for use with MPLS Layer 3 VPNs. For setting up VRF lite, the virtual-router type is the most appropriate.
routing-instances {
  guest_inet {
    instance-type virtual-router;
    interface ge-2/0/0.200;
    interface ge-2/0/2.0;
  }
}
This bit of the configuration creates the guest_inet routing instance and binds two interfaces to it. There's no additional configuration needed on the actual interfaces themselves.
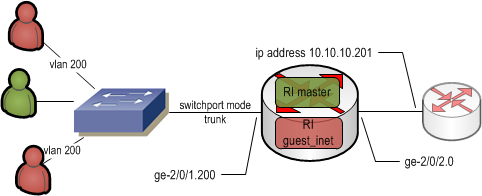
When this routing instance is created, there is a corresponding routing table created named guest_inet.inet.0. This table will receive the "direct" routes from the two interfaces that were added to the routing instance.
root@router> show route table guest_inet.inet.0
guest_inet.inet.0: 2 destinations, 2 routes (2 active, 0 holddown, 0 hidden)
+ = Active Route, - = Last Active, * = Both

10.200.200.0/24    *[Direct/0] 00:01:55
                    > via ge-2/0/1.200
10.10.10.200/30    *[Direct/0] 00:01:55
                    > via ge-2/0/2.0
Like the IOS example above, we need a default route to send traffic towards the Internet. Protocols such as OSPF, BGP, and ISIS are configured in a routing instance at the [routing-instances guest_inet protocols] level and static routes are configured at [routing-instances guest_inet routing-options].
root@router> show configuration routing-instances guest_inet routing-options
static {
  route 0.0.0.0/0 next-hop 10.10.10.201;
}
When doing reachability tests, use the "routing-instance" keyword to specify which instance to use.
root@router> ping www.google.com routing-instance guest_inet
root@router> traceroute www.google.com routing-instance guest_inet
To see the status of a routing instance use show route instance
root@router> show route instance guest_inet detail
guest_inet:
  Router ID: 10.200.200.1
  Type: virtual-router State: Active
  Interfaces:
    ge-2/0/1.200
    ge-2/0/2.0
  Tables:
    guest_inet.inet.0 : 3 routes (3 active, 0 holddown, 0 hidden)
Further Reading⌗
Cisco:
Path Isolation Deploying VRF-Lite and GRE - This particular section of the Path Isolation Design Guide gives a nice example of using GRE with VRF lite. It includes the commands needed to make VRF lite work in an example network. It even goes much farther and talks about virtualizing routing protocols and then gets into using full MPLS.
Juniper:
Routing Instances Overview - An overview of what routing instances are and the different types.