Upgrading ESXi Hypervisor to 5.1
Ahh the Christmas break. The perfect time for good food, enjoying the company of family and friends and of course.... IT projects at home! My project last year was to immerse myself in the source code for OpenBSD's snmp daemon so that I could integrate my patch-set for Net-SNMP directly into the native OpenBSD daemon. That was time well spent as I was able to integrate my code in the following weeks. This year I have maintenance to do in the home lab. It looks like 2013 is going to be a busy year as far as getting my hands on new stuff so I want the lab ready to rock.
First project: upgrade my VMware ESXi server from 4.1 to 5.1.
Since I'm running the free edition of ESXi Hypervisor, the options for upgrading are artificially limited. Besides that, it's been a while since I setup an ESXi host so I opted to do a clean install and step through setting things up all over again. The overall steps where:
- Take a backup of the ESXi host
- Backup the vSphere Management Assistant (vMA) appliance
- Install the 5.1 version of the Virtual Infrastructure Client (VI Client)
- Create a bootable USB drive
- Install ESXi 5.1
- Configure the host
- Add VMs back into inventory
Backups⌗
Even though I was planning on nuking everything and starting from scratch, I wanted that safety net of having a copy of the configuration in case I needed help getting things setup again. I did a proper backup of the host from vMA using the esxcfg-cfgbackup command (the name of my host is omicron):
esxcfg-cfgbackup --server omicron --username root --save omicron.tgz
I also took screenshots of most of the pages under the Configuration tab in the VI Client.
The last thing I backed up was the vMA appliance. This being my first ESXi upgrade I'm not sure if this is normal or not, but you cannot upgrade to vMA 5.1 you must do a fresh install (as per VMware docs). I have a couple of scripts on the vMA so I backed those up in preparation of blowing away that machine as well.
VI Client⌗
Just to get this out of the way, I installed version 5.1 of the VI Client on my workstation. Note that this did not preclude me from connecting to my host while it was still running 4.1. When you install a new version of the client over top of an existing version, it just installs all the libraries and glue needed to connect to a host running that same version. In my case, I could now connect to a host running 4.1 or 5.1. It's refreshing to see the software engineers behind the VI Client make this completely painless from the end user point of view.
Bootable USB Drive⌗
This is the part that took me the longest. I'll explain why. First off, my host does not have an optical drive. I can't remember why. No matter, it's got USB ports to spare. I decide to create a bootable USB drive using the VMware-VMvisor-Installer-5.1.0 ISO image from VMware. I used these docs from vmware.com as my guide. I had to improvise slightly because the document assumes you're running Linux on your workstation but I'm actually running Windows. The basics steps were:
- Download SYSLINUX
- Format a USB stick as FAT32
- Use SYSLINUX to make the stick bootable
- Mount the VMware-VMvisor-Installer-5.1.0 ISO and copy the contents to the USB stick
- Rename the "isolinux.cfg" file on the stick to "syslinux.cfg" and edit it according to the VMware doc above
Here's the part that I overlooked which caused me a headache for a while. In the VMware document, it says to run these commands (keeping in mind they're assuming you're on Linux):
/path_to_syslinux-3.86_directory/syslinux-3.86/bin/syslinux /dev/sdb1
cat /path_to_syslinux-3.86_directory/syslinux-3.86/usr/share/syslinux/mbr.bin > /dev/sdb
Notice they are being specific about the version of SYSLINUX (3.86). I had downloaded the latest version (which at the time was 5.00). This results in an error when booting from the USB stick. Something to the effect of "Cannot load menu.c32". This caused some head-scratching until I realized my mistake.
You must use SYSLINUX v3.86 when making a bootable ESXi install disk
In the end, this is the command I used to make the USB stick bootable:
D:\syslinux-3.86\win32> syslinux.exe --mbr --active --install f:
Install ESXi and Configure⌗
This was very straightforward. Go through the installation and do the initial host configuration on the console. Then flip over to the VI Client and do the rest of the config (vSwitches, port groups, NTP, enable SSH, mount storage volumes, etc).
Add VMs Back into Inventory⌗
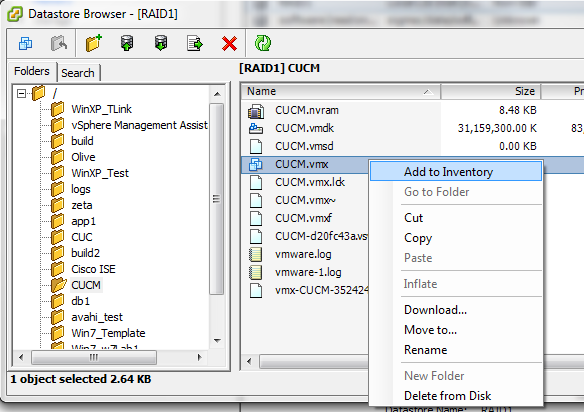
When ESXi is installed, it detects the attached VMFS volume(s) but does not automatically add the VMs therein to the VM inventory. The machines have to be added manually. In the VI Client, go to the Configuration tab (for the host), Storage and browse the appropriate datastore. Select the folder that contains the VM, find the .vmx file, right-click and choose "Add to Inventory".

The only machine I did not add back to the inventory was the vMA. I instead created a new vMA VM by deploying vMA OVF which I downloaded from vmware.com.
That's about it. ESXi host upgraded!