Careful Control of Keys: How I Use MFA with the AWS CLI

Table of Contents
Passwords suffer from an inherent risk: whoever possess the password inherits the privileges granted by that password. If the possessor is the intended person, then all is good. Otherwise, all is not so good because it means an unintended person has access to the system the password is guarding.
API tokens carry the same risk: the token holder inherits whatever permissions are associated with that token.
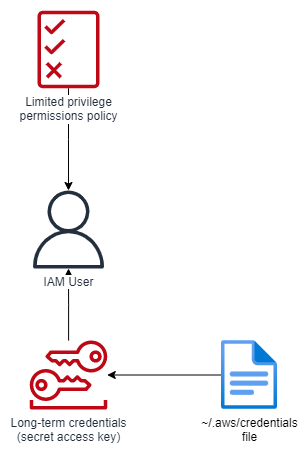
AWS Identity and Access Management (IAM) access keys can be thought of as a kind of password or API token (take your pick). Access keys are long-lived credentials, like passwords and API tokens, which grant access to an AWS account to whoever possesses the key.
In this post, I will walk you through the pattern I use which reduces the risk of a misappropriated access key being used by an unintended entity to gain privileged access to the associated AWS account.
This post assumes you have basic familiarity with AWS IAM, the AWS Command Line Interface (CLI), and with the Unix shell.
Multi-factor authentication⌗
Multi-factor authentication (MFA) (sometimes referred to as two-factor authentication or 2FA) provides the basis for mitigating the risk of static security credentials, such as passwords, being used by an unintended entity to log into a system. It does this by requiring that you share something you know while also proving you are in possession of something you have, when you authenticate to the system.
- Something you know: The password, API key, or access key. You must know the correct value of this item and provide it during authentication.
- Something you have: A token generator or security key. You must provide the token or cryptographic artifact which is generated by this "something" you have in your possession.
This authentication scheme can do a good job of mitigating the risk of the "something you know" component being exposed: even if an unintended entity has possession of the password or access key, they would, presumably, not also have access to the "something you have" and therefore be unable to provide that second factor during authentication. And without both, they are denied access.
An implicit requirement for securely using MFA is to keep the password and the seed for the token generator separate. If an attacker cracks your system and finds the seed for your token generator sitting alongside your password, having MFA enabled won't protect you since the attacker now knows what you know and has what you have.
Configuring MFA in AWS⌗
AWS supports--and recommends--using MFA to secure the root and IAM user accounts. MFA can be enabled for users in AWS IAM and for centrally-managed identities in AWS Identity Center. Where your identities live (IAM or Identity Center) will make a difference in how you use the AWS CLI to authenticate. The pattern I show in this post works equally well with IAM or Identity Center, however the rest of this post will focus on configuring and using MFA with users in IAM.
To set up MFA for your IAM user, follow the appropriate instructions in the Enabling MFA devices for users in AWS section of the AWS IAM documentation.
There are a number of conditions for using MFA with the AWS CLI or API. Notably, you cannot use a U2F security key as your MFA device and must instead use a time-based (TOTP) device. Time-based devices are the ones which show you a new set of numbers at regular intervals. The rest of this post will refer to these numbers as the token.
MFA guardrails⌗
Now that an MFA device is configured for your IAM user, its use needs to be enforced.
When you logged into the AWS console after setting up MFA for your IAM user, you may have noticed you were prompted for your MFA token. Great! However, there is no such prompt when using the AWS CLI or API. You'll find you're granted access with just your secret access key; no need to provide your MFA token.
When using the AWS CLI or API, use of MFA is enforced by IAM policy conditions. Citing the AWS IAM documentation, there are two MFA conditions which can be applied:
- Existence: Check the
aws:MultiFactorAuthPresentcondition key isTrueusing aBoolcondition. Answers the question: Has authentication been performed with MFA? - Duration: Check the
aws:MultiFactorAuthAgecondition key has a value less then or equal to your desired time window. Answers the question: How long has it been since authentication with MFA occurred?
The aws:MultiFactorAuthPresent condition key is only present in the
request context
when the entity authenticates with short-term credentials. Long-term credentials, such
as access keys, do not include this key. This means you need to first retrieve temporary
credentials using MFA before attempting any privileged actions which are conditional on
MFA. Read on to understand how to do this.
Here is an example IAM policy which uses the two MFA conditions mentioned above. This policy is a trust policy for an IAM role.
{
  "Version": "2012-10-17",
  "Statement": {
    "Effect": "Allow",
    "Principal": {
      "AWS": "arn:aws:iam::123456789012:user/joel"
    },
    "Action": "sts:AssumeRole",
    "Condition": {
      "Bool": {
        "aws:MultiFactorAuthPresent": "true"
      },
      "NumericLessThan": {
        "aws:MultiFactorAuthAge": 3600
      }
    }
  }
}
When applied as a role's trust policy, the policy allows IAM user joel in account
123456789012 to assume the role so long as joel has authenticated via MFA and
authentication occurred within the last hour (3600 seconds). This policy will affect
joel in both the web console and AWS CLI.
Note this policy enforces MFA but you haven't yet taken steps to use MFA from the CLI. That's what the next section will cover.
Using MFA from CLI⌗
There is no option to directly use MFA with the AWS CLI. If you think about it, that would be inconvenient. Imagine having to enter your MFA code for every AWS CLI command you ran. No, thanks! Instead, using MFA with the AWS CLI is a two-step process:
- Use your long-term access key credentials combined with your MFA token to obtain new, temporary credentials.
- Use the temporary credentials to execute MFA-conditioned actions such as assuming a privileged role.
The way to accomplish #1 is to use the GetSessionToken API. Quoting the AWS documentation again:
GetSessionToken returns a set of temporary credentials for an AWS account or IAM user. The credentials consist of an access key ID, a secret access key, and a security token. Typically, you use GetSessionToken if you want to use MFA to protect programmatic calls to specific AWS API operations. MFA-enabled IAM users would need to call GetSessionToken and submit an MFA code that is associated with their MFA device.
This API returns a set of credentials which you can use with the AWS CLI or to make API calls. However, unlike your IAM user's long-term secret access key, these credentials:
- Have an expiry time.
- Include the two MFA conditions discussed above in their request context.
The access key ID, secret access key, and session token which GetSessionToken returns
can be used to create a new profile in the ~/.aws/credentials file which makes it easy
to use the GetSessionToken credentials for further AWS CLI commands.
In order to automate the call to GetSessionToken, capture the return values, and
update the ~/.aws/credentials file, the following shell code can be used by copying it
to ~/awsmfa.sh and making it executable with chmod 755 ~/awsmfa.sh.
#!/bin/sh

# This uses MFA devices to get temporary (eg 12 hour) credentials.  Requires
# a TTY for user input.
#
# Forked from https://gist.github.com/Yloganathan/c24a3d99213c72c7316269a1888b2600
#
# GPL 2 or higher

SESSION_DURATION=14400

set -ef -o pipefail

if [ ! -t 0 ]; then
  echo "Must be on a tty"
  exit 1
fi

if [ -n "$1" ]; then
  export AWS_PROFILE=$1
fi

# From here, don't allow unset variables.
set -u

identity=$(aws sts get-caller-identity --query Arn --output text)
username=$(echo -- "$identity" | sed -n 's!.*/!!p')
if [ -z "$username" ]; then
  echo "Can not identify who you are. Something failed when calling GetCallerIdentity."
  exit 1
fi

echo "User $identity"

# XXX this isn't robust enough if the user has > 1 MFA device.
device=$(aws iam list-mfa-devices --user-name "$username" --query 'MFADevices[0].SerialNumber' --output text)
if [ "$device" = "null" -o $? -ne 0 ]; then
  mfa=$(aws iam list-mfa-devices --user-name "$username")
  echo "Can not find any MFA device(s) for you."
  echo
  echo $mfa
  exit 1
fi

echo "MFA  $device"

echo -n "Enter your MFA code: "
read code

tokens=$(aws sts get-session-token --serial-number "$device" --token-code $code --duration-seconds $SESSION_DURATION)

secret=$(echo -- "$tokens" | sed -n 's!.*"SecretAccessKey": "\(.*\)".*!\1!p')
session=$(echo -- "$tokens" | sed -n 's!.*"SessionToken": "\(.*\)".*!\1!p')
access=$(echo -- "$tokens" | sed -n 's!.*"AccessKeyId": "\(.*\)".*!\1!p')
expire=$(echo -- "$tokens" | sed -n 's!.*"Expiration": "\(.*\)".*!\1!p')

if [ -z "$secret" -o -z "$session" -o -z "$access" ]
then
  echo "Unable to get temporary credentials."
  echo "Could not find secret/access/session tokens in GetSessionToken output."
  exit 1
fi

profile="${username}mfa"
aws --profile $profile configure set aws_access_key_id $access
aws --profile $profile configure set aws_secret_access_key $secret
aws --profile $profile configure set aws_session_token $session

echo "Session valid until $expire using CLI profile $profile"
To use this script, you first have to create an AWS CLI profile using the aws configure or aws configure --profile <name> command. When prompted, enter the access
key ID and secret access key associated with your IAM user. Then, authenticate with MFA
by calling the script.
# If your IAM user is set up under the default AWS CLI profile:
~/awsmfa.sh

# If your IAM user is set up under a non-default AWS CLI profile:
~/awsmfa.sh <profile>
Putting the pieces together⌗
Here's what it looks like when all of these pieces are put together.
Step 1. Create an IAM user⌗
To start, create an IAM user and configure an access key for that user.
The user's access key ID and secret access key must be configured in the AWS CLI using
the aws configure [--profile <profile>] command.
Critically, this user must have limited permissions. Remember: the permissions assigned to this user are also assigned to the long-term access key. The objective is to limit the privileges an unintended party would have should they gain possession of the access key.
In order for this user to do anything useful on AWS, they will assume an IAM role which
has permissions to do actual work (for example, create a storage bucket or launch a
compute instance). The only permission the IAM user itself requires is sts:AssumeRole which
could be scoped to just the role(s) the user needs to assume. An identity policy which
allows the user to assume a role named Role could look like this:
{
    "Version": "2012-10-17",
    "Statement": [
        {
            "Sid": "AllowAssumingRoles",
            "Effect": "Allow",
            "Action": "sts:AssumeRole",
            "Resource": "arn:aws:iam::<ACCOUNT-ID>:role/Role"
        }
    ]
}
Step 2. Retrieve temporary credentials using MFA⌗
Run the awsmfa.sh script to retrieve temporary credentials using your MFA token.
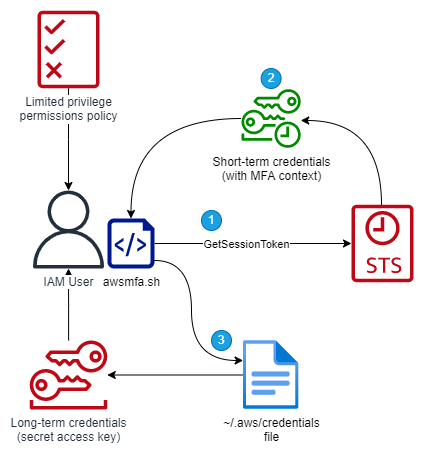
- The
awsmfa.shscript prompts you for your MFA token and calls theGetSessionTokenAPI. - AWS Security Token Service (STS) returns temporary credentials for the IAM user. Authorization requests using these credentials includes the MFA condition keys in the request context.
- The
awsmfa.shscript stores the temporary credentials in the~/.aws/credentialsfile under a new profile name.
NOTE: These temporary credentials have the same permissions as the IAM user's long-term credentials; these credentials do not provide elevated permissions. The only difference is that these credentials include the MFA conditions in their request context which is needed for the next step.
Step 3. Call an action which requires MFA⌗
Use the temporary credentials to call a privileged action such as assuming a privileged IAM role.
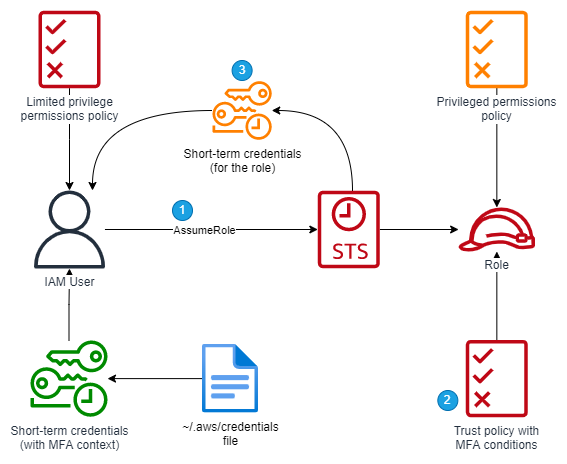
- Using the temporary credentials, call the
AssumeRoleAPI. - AWS IAM authorizes the request against the identity policy assigned to the IAM user
and the trust policy assigned to the role being assumed. The role's trust policy uses
the
aws:MultiFactorAuthPresentcondition key to require the credentials being used to assume the role were obtained after authenticating using MFA, and optionally uses theaws:MultiFactorAuthAgecondition key to limit the age of MFA-obtained credentials which can assume the role. - STS returns a new set of temporary credentials which can be used to perform actions as the role.
You can
configure the AWS CLI to use a role
in which case it will take care of calling AssumeRole for you. You'll want to
configure your MFA role as the source_profile when you configure the CLI (the
awsmfa.sh script will tell you the name of the MFA profile it configured).
Step 4. Use the privileged role⌗
Use the temporary credentials returned by the AssumeRole API to elevate your
permissions and perform privileged actions.
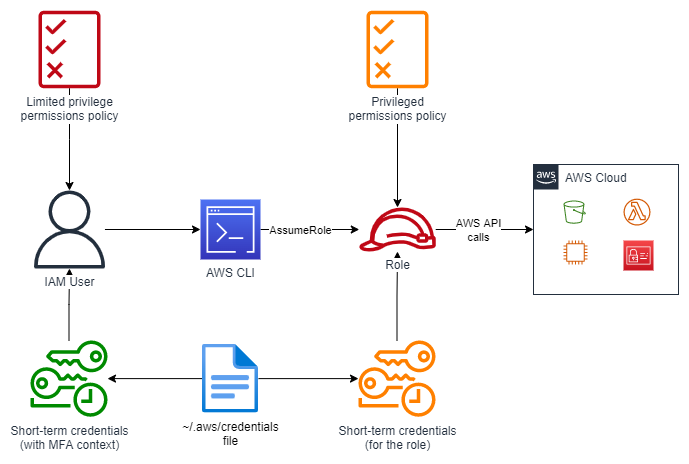
When using the AWS CLI, this would mean passing the --profile argument and specifying
the name of the profile you created for the role while following the instructions for
configuring the AWS CLI to use a role in step 3. For example:
aws --profile myrole s3 ls
To run this command, the AWS CLI calls AssumeRole and uses the returned credentials to
list the Amazon S3 buckets in the account.
To Re-Cap⌗
By reducing the permissions assigned to your IAM user to less than what is required for
your day-to-day activities, you can reduce the privileges that an unauthorized actor
inherits should they come to posses your access key. Then, by using MFA and the
GetSessionToken API, you can elevate your permissions using multiple factors--factors
an attacker would not have access to. This post outlines a pattern for doing this,
including a shell script which automates the retrieval of temporary security credentials
and storing them for use by the AWS CLI.
Reference⌗
- Using multi-factor authentication with AWS
- Configuring MFA-protected API access
- IAM JSON policy elements: Condition
Disclaimer: The opinions and information expressed in this blog article are my own and not necessarily those of Amazon Web Services or Amazon, Inc.